You don't need a camera
Before anything else: the Mach Loop is worth visiting whether you're carrying a £10,000 telephoto rig or nothing at all. Plenty of visitors come purely for the spectacle — hearing a Typhoon or F-15 thunder through a mountain valley at low level is an experience that no photograph fully captures. The "Mark 1 Eyeball" is a perfectly valid piece of kit. Stand at Cad East or The Bwlch, watch the ridge line, listen for the rumble, and just take it all in. You'll remember it far longer than any JPEG.
That said, if you do want to capture what you see, this guide covers everything from phones to professional glass.
Military aircraft pass through this valley at extremely low level and very high speed. A drone in or near the flight path puts aircrew lives at risk. Simply: DO NOT bring a drone to the Mach Loop.
A starter kit that works
If you're looking to get into Mach Loop photography without spending a fortune, a used or entry-level DSLR paired with a telephoto zoom is one of the most cost-effective ways to start. The setup below is an example of a practical, capable combination that would produce strong results at most Loop locations — there are cheaper and more expensive alternatives, but this kind of pairing represents a sensible starting point.
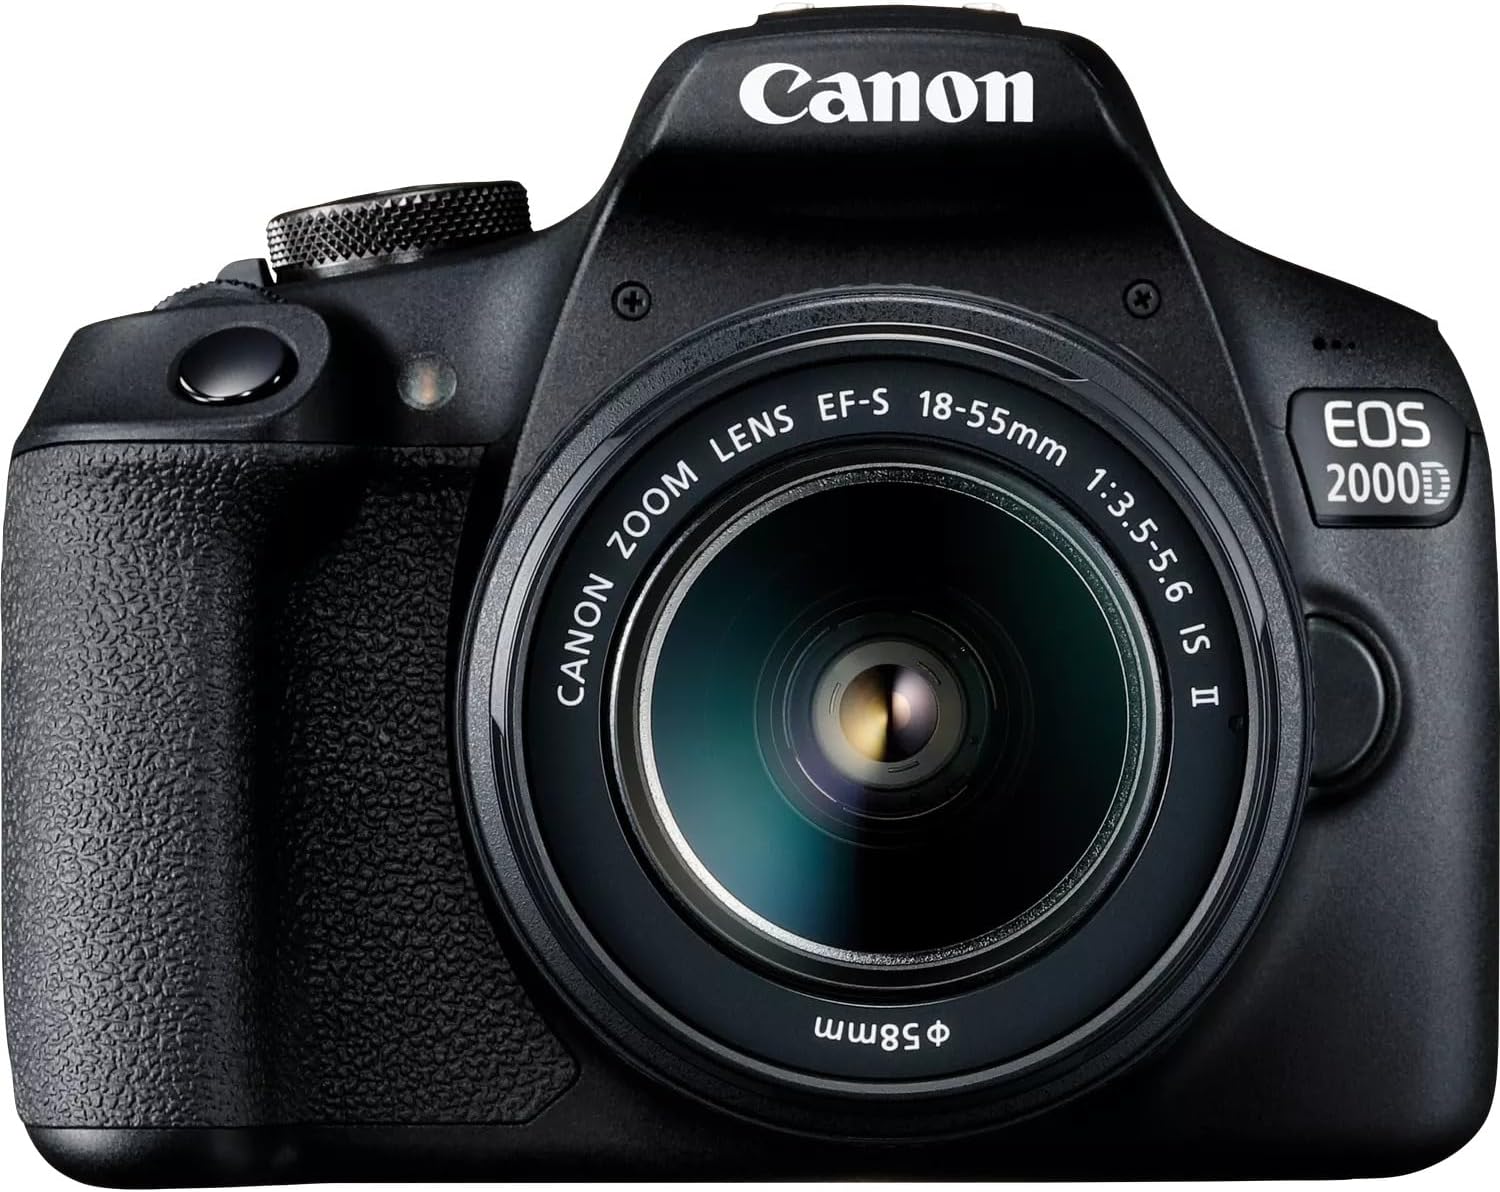
Canon EOS 2000D DSLR
- 24MP APS-C sensor — good detail even with heavy cropping
- AI Servo AF suitable for tracking fast-moving aircraft
- Wide Canon EF/EF-S lens ecosystem
- Lightweight and straightforward to operate in the field

Canon EF-S 55–250mm f/4–5.6 IS STM
- Effective 88–400mm on APS-C — versatile across locations
- Image stabilisation useful when handheld at longer focal lengths
- Compact and light enough for a full day on the hill
- Good value for the focal range offered
Phone photography
Modern smartphones are genuinely capable in the right conditions, and plenty of striking Mach Loop shots have been taken on phones. The key limitation is burst speed and autofocus latency — most phones struggle to track a fast jet reliably. If you're shooting on a phone, switch to Pro or Manual mode and set shutter speed to at least 1/2000s. Use the native camera app rather than third-party apps as it typically has faster shutter response. Video is often a better strategy on a phone: shoot 4K at 60fps and pull frames from the moments you want. Avoid digital zoom — move to a better position instead.
Camera settings — the basics
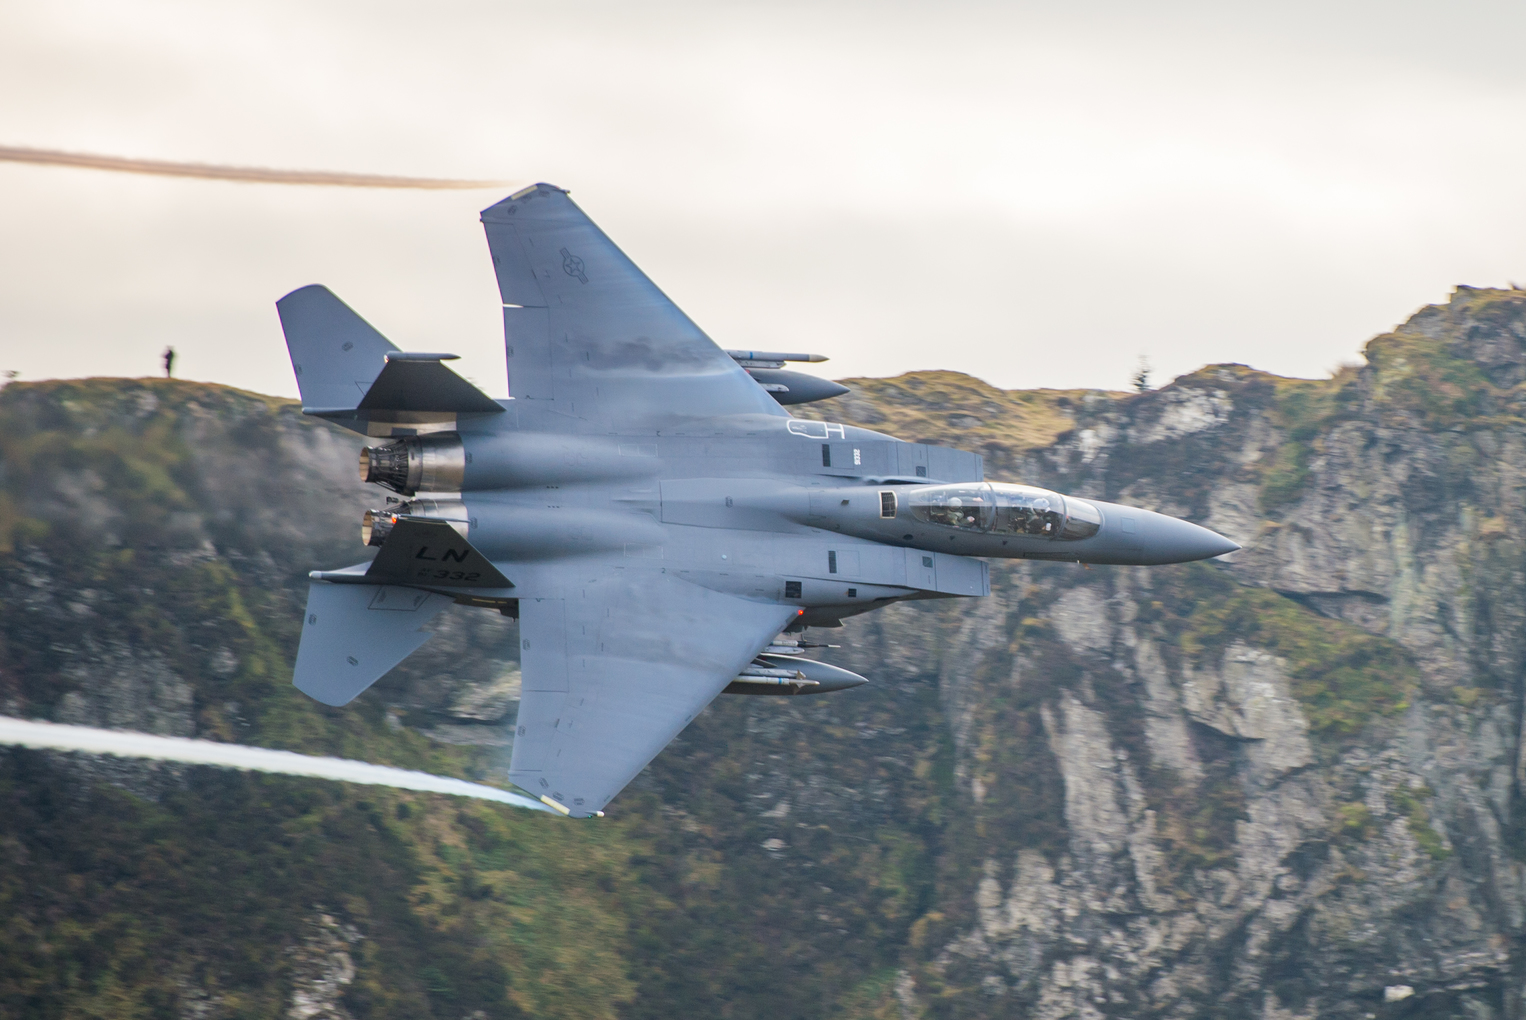
A Typhoon at 420 knots travels roughly 215 metres per second. At that speed, any hesitation in your settings costs you the shot. The minimum usable shutter speed is 1/1600s, but most experienced Mach Loop photographers won't go below 1/2000s, and in good light 1/3200s–1/4000s gives you real comfort margin, especially for nose-on or crossing shots where there's no panning motion to help freeze the aircraft.
Shoot in Aperture Priority or full Manual. Shutter Priority can hunt the aperture into an unusable range if cloud cover changes quickly, which it does in the Welsh mountains. Set a minimum shutter speed with auto-ISO if your camera supports it — this is one of the most practical settings for the Loop, where you may be waiting in overcast conditions and then suddenly shooting in a bright gap.
Use continuous autofocus throughout: AI Servo on Canon, AFC on Nikon and Pentax, AF-C on Sony and Fujifilm. Enable your camera's subject tracking or zone AF rather than a single central point — aircraft move unpredictably in the final seconds before a pass, and a wider tracking area gives the AF system more to work with. Set high-speed burst mode; even at 10–12fps you'll often find that only two or three frames in a burst are perfectly sharp and well-composed, so volume matters.
Aperture of f/6.3 to f/8 balances depth of field against shutter speed. Shooting wide open (f/4 or f/5.6) on a long lens gives a very thin focus plane — if your AF is even slightly out, the shot is lost. f/7.1 is a safe default at most locations. ISO: use Auto-ISO with a maximum ceiling of 3200–6400 depending on how much noise your sensor handles. Mach Loop shots are typically cropped and viewed large, so noise matters more than it might in other contexts.
Lens choice
Focal length is dictated by location more than anything else. As a starting point:
- Cad East: 400–500mm (full frame equivalent). Aircraft pass in the valley below at medium distance, and longer glass fills the frame well.
- The Bwlch: 400–600mm. The classic overhead and banking shots benefit from reach. Some photographers bring a 600mm prime for this spot.
- Cad West: 200–400mm. When level passes happen here, aircraft can be very close — too much focal length and you'll miss the shot entirely as the jet clips through your field of view.
- Corris / approach roads: 300–400mm is typical, but some entry-point shots suit 200mm or wider if you're after environmental context.
The most versatile single lens for a first visit is a 100–400mm or 150–600mm zoom. These cover the majority of scenarios across multiple locations without requiring a lens change mid-visit. Browse telephoto zoom lenses on Amazon (Amazon affiliate link) — the Sigma and Tamron 150–600mm variants are popular choices among Loop regulars for their reach-to-cost ratio.
Prime lenses (400mm f/2.8, 500mm f/4, 600mm f/4) give superior sharpness and AF speed but are large, heavy, and expensive — they're common at The Bwlch where photographers settle in one spot for hours. A teleconverter (1.4× or 2×) can extend reach on compatible lenses but costs autofocus speed — test yours at home before relying on it at the Loop.
Most serious Mach Loop photographers shoot Canon or Nikon DSLRs or their mirrorless equivalents, owing to the wide range of long telephoto lenses available for both systems. Browse Canon and Nikon DSLRs on Amazon (Amazon affiliate link). Sony mirrorless bodies have become increasingly popular due to their subject-tracking autofocus performance. Fujifilm APS-C systems offer an effective 1.5× crop factor, turning a 400mm lens into 600mm equivalent — useful for Bwlch shooting.
Tracking technique
Tracking a fast jet through mountain terrain is a skill that improves with practice — don't be discouraged if your first visit yields few keepers. A few things that help:
Know your entry point. At each location, aircraft appear from a specific direction and over a specific piece of terrain. Learn this before the first jet arrives. At Cad East, for example, aircraft typically appear low over the ridge to the right; at The Bwlch, the key moment is the aircraft cresting the ridge below and banking. Knowing exactly where to look means you start tracking earlier.
Listen. Jet noise at low level travels faster than you might expect, but the aircraft is still often audible a few seconds before it appears. The moment you hear the rumble, raise your camera and find the entry point. Experienced visitors — and the spotters at each location — will often call the direction and type. Follow the shouting.
Pre-focus. In the seconds before a pass, point your lens at the spot you expect the aircraft to appear and half-press the shutter to let the AF system lock onto the terrain. When the jet arrives, the AF has a shorter distance to travel to find it. Some photographers pre-focus manually on the anticipated entry point and switch to AF the moment the aircraft appears.
Pan smoothly. Keep your elbows tucked in, pivot from the hips, and follow through past the shot — stopping your pan the moment you fire kills the smoothness. A ball head on a tripod can actually hinder tracking; a fluid video head or gimbal head works better if you're on a tripod. Monopods are popular at the Loop for their combination of support and freedom of movement.
Shoot earlier than you think. The instinct is to wait for the "perfect" moment — but fast jets give you very little time. Start bursting when the aircraft first comes into a shootable position, not when it's in the ideal frame. You can always delete; you can't recover a missed pass.
Best locations for photography
Cad East offers good three-quarter front shots with the mountains as a backdrop. Aircraft arrive from the right along a predictable track, giving reasonable warning, and the angle works well for capturing the aircraft in context with the surrounding terrain.
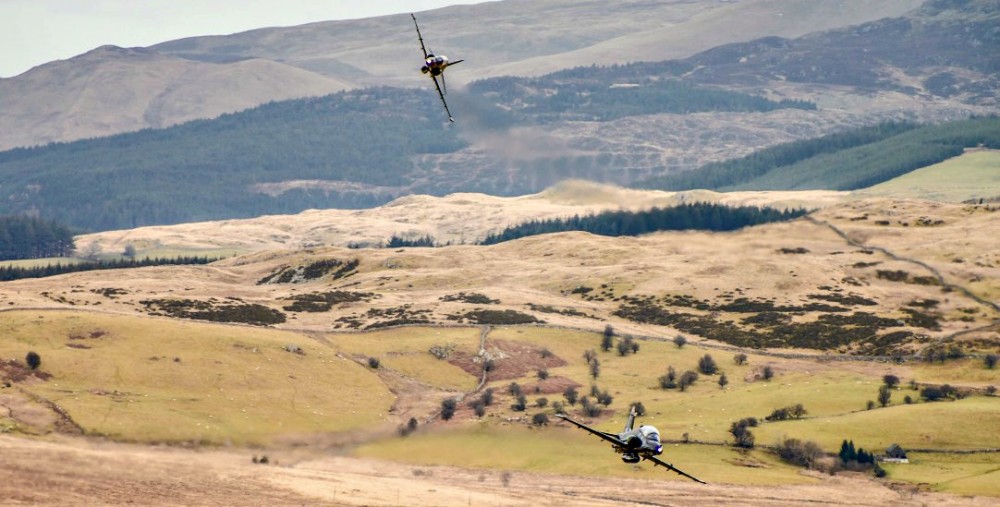
The Bwlch is the iconic location for a reason. Aircraft passing below and banking hard produce the silhouette and banked-wing shots that define Mach Loop photography. The longer focal lengths needed (500–600mm+) and the unpredictability of the exact pass line make it challenging, but on a good day with clear visibility the shots available here are unlike anything at the other spots. Arrive early to secure a position — this is the busiest location on active days.
Cad West is one of the best spots for a first visit and the most dramatic when a level valley pass comes through. Aircraft can be extremely close, low shots with terrain on both sides of the frame are possible, and the variety of angles keeps things interesting throughout the day. Keep focal length shorter than you think — 200–300mm is often right, and a 70–200mm zoom gives you the flexibility to react quickly.
Corris and road-level spots are worth considering for variety — you sacrifice elevation but gain different perspectives, including some shots that show the full valley context rather than just the aircraft.
For a broader sense of what's possible at the Loop, see the photo gallery and video archive
Light and weather
The Mach Loop sits in the Welsh mountains, and weather changes fast. Overcast days are not necessarily bad for photography: flat light reduces harsh shadows on the aircraft's underside (which is often what you're seeing) and can produce clean, evenly-lit results. Bright sunshine with cumulus cloud creates the most dramatic backdrops but also the most challenging exposure conditions — the aircraft in shade against a bright cloud can fool metering systems. Use spot or centre-weighted metering and expose for the aircraft, not the sky.
Golden hour (early morning or late afternoon) is rarely relevant at the Loop, as military flying typically takes place during core daytime hours. The most practically useful thing you can do is check the weather the evening before and understand the cloud base — low cloud that obscures the ridge line at Cad East means nothing will come through, regardless of how busy a flying day it is.
Rain itself doesn't always stop flying, but it makes photography uncomfortable and can produce interesting atmospheric shots with low mist in the valley. A rain cover for your camera and lens is worth carrying at any time of year.
Post-processing
Mach Loop shots almost always need cropping, even with long glass — the aircraft fills a smaller proportion of the frame than it looks like in the moment. Shoot RAW if your workflow supports it; the extra latitude for exposure and white balance correction is valuable when light is changing rapidly. Sharpening and clarity adjustments can recover detail in slightly soft shots, but there's no substitute for getting focus right in camera. Colour profiles vary widely across aircraft types — grey RAF jets in overcast light benefit from contrast boosts, while tan-painted USAF aircraft often need warmer white balance.
Video
Video at the Mach Loop is a different discipline to stills. The 180-degree shutter rule means setting shutter speed to double your frame rate — 1/100s at 50fps, 1/120s at 60fps — which gives natural motion blur rather than the strobed, stuttery look of fast shutter speeds applied to video. At those shutter speeds in bright conditions you'll need ND filters to control exposure; a variable ND (2–8 stop range) is the most practical choice for a location where light changes quickly.
A fluid head makes an enormous difference — the panning motion needs to be completely smooth to look good on video, and a ball head or pan-tilt head will introduce judder. Gimbals work well for shorter, lighter lens combinations. Shoot 4K where your camera supports it; the resolution overhead allows reframing in post and means you can extract usable still frames from a strong pass you missed on the stills body.
Audio is often overlooked but is a significant part of what makes Mach Loop video compelling. The onboard microphone on most cameras will clip badly on a low pass — the sound pressure level is simply too high. A dedicated external microphone with a high SPL rating, or setting the camera's audio input level to its lowest setting, can help preserve some of the character of the pass without total distortion.